Pre-Quilting Fabric
Let’s Pre-Quilt Fabric for a POP Bag!
Looking for some POP inspiration as we head into summer 2024? Today’s blog will walk you through how to pre-quilt fabric with the POP Rainbow Heart Quilting design. Once the quilting is done, we’ll take that quilted fabric and use it to make an adorable in-the-hoop “Scoop” bag!

Supplies Needed for Embroidery
-
POP! Rainbow Heart Quilting Design
-
POP! Scoop Bag (6x6 size-6x10 hoop used for this blog)
-
Cutaway Stabilizer
Instructions Part 1: Pre-Quilting Your Fabric
-
On your computer, download the POP Rainbow Heart Quilting embroidery design and save it to a location you can easily find it.
-
Open Embrilliance Essentials software on your computer. Navigate to the “not connected” folder and pick the size you would like.
**Note on choosing quilting design size**
Option 1- 9x14 hoop, one hooping
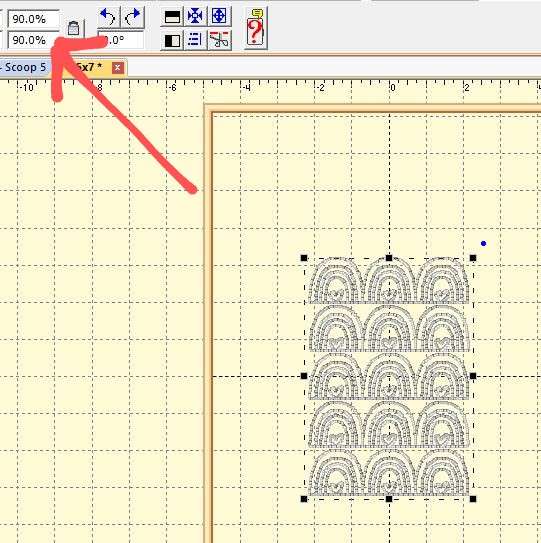
For this blog, I made the 6x6 (6x10 hoop) Scoop Bag design with the fabric after I quilted it. I wanted to fit as many rainbows on the bag as I could. I chose the smallest quilting option-5x7 because with this design, the rainbows are smaller in size. *I had to shrink the original 5x7 design down by 10% to fit all 4 onto the 9x14 hoop. As a general rule-POP DOES NOT RECOMMEND ALTERING ANY DESIGN SIZE. *However, for this particular design, reducing it to 90% did not cause any problems that I could see.
- To shrink a design by 10%, first, load the original design into Embrilliance Essentials and look to the top left of your screen where it shows the design size.
- Click the top right box and change the horizontal scaling to “90%”. It will automatically change the vertical scaling (bottom right box) to 90%


- Now right click to “copy” and “paste” 3 more of this 90% scale design onto your screen and line them up vertically and horizontally.
By doing this, I only had to run one hooping of quilting on fabric in order to have enough fabric for the two pieces of fabric needed for the exterior front and back of the Scoop Bag.Option 1 allows for about 12 small rainbows to fit on the front of the scoop bag.


(To figure out how many rainbows would fit and get an idea of how it would look, I loaded the 6x6 size scoop bag into Embrilliance and then “copy” and “pasted” the bag design directly on top of the rainbow heart quilting design. Just be sure to delete the bag design off of the quilting design before saving. It’s only to preview how your finished product will look!

Option 2- 6x10 hoop, 2 hoopings
If you would rather keep things more simple, or if you don’t have a 9x14 hoop, do this! Load the 6x10 rainbow heart quilting design. You will have to complete two hoopings with this option- one for the front fabric exterior piece and another for the back fabric exterior piece of the bag. With this option, you will fit approximately 6 rainbows onto the 6x6 scoop bag. The picture below shows the 6x6 scoop bag copy and pasted on top of the 6x10 rainbow heart quilting design to give you an idea of how that bag would look when you’re finished.

(If you’re not using software, you can skip steps 3-6 of this blog post and just load the 6x10 rainbow heart quilting design directly from your usb onto your machine.)
-
Navigate to the quilting design size that you’d like and click the “Open” folder on the upper left side of your screen. The POP Rainbow Quilting embroidery design will now be loaded in the middle of your screen.
-
Time to save your design!
-
Insert your USB stick into your computer. Then click “File > “Save As (Stitch and Working)”
-
Navigate to your USB Drive and desired folder and then click “Save”.

Let’s Get Stitching!
-
Insert your USB Drive into your embroidery machine and load your rainbow heart quilting design.
-
Hoop cutaway stabilizer. I prefer to use a no-show mesh cutaway for bags but regular cutaway would work well too!
-
Lay a piece of batting on top of your stabilizer large enough to cover the entire embroidery area for the quilting.
-
Lay your fabric right side up on top of the batting. (I used fusible fleece and chose to iron it on to the back of my fabric instead. Either option works!)
- Secure fabric and batting to stabilizer with tape on the perimeter of your fabric outside of where the quilting design will be stitching.
- Run the rainbow heart quilting design directly onto your fabric.
-
Remove your quilted fabric from the hoop and set it aside.
-
If you’re using the 6x10 size quilting design and hoop, you will need to repeat steps 8-12 for the second piece of fabric that you will need for the back of your scoop bag.
Your fabric is now quilted and you’re ready for part 2!


Instructions Part 2- Using your pre-quilted fabric with the Scoop Bag!
You will be using the POP Scoop Bag full tutorial as your main guide for the construction of this bag. This blog will cover how to ensure your quilting fabric fits.
-
Load the 6x6 Scoop Bag design on your embroidery machine.
-
Run steps 1-2 following the full Scoop Bag PDF tutorial.
*If you picked option 2 in Part 1 of these instructions, you have two 6x10 pieces of quilted fabric. You can follow the scoop bag PDF instructions using your two quilted pieces as your front exterior and back exterior of your bag just as the scoop bag tutorial instructs you checking to be sure that when you flip your fabric down, it will cover the entire bag outline.
*If you chose option 1 in the part 1 instructions of this blog (the 9x14 quilted piece of fabric), follow the steps and pictures below.
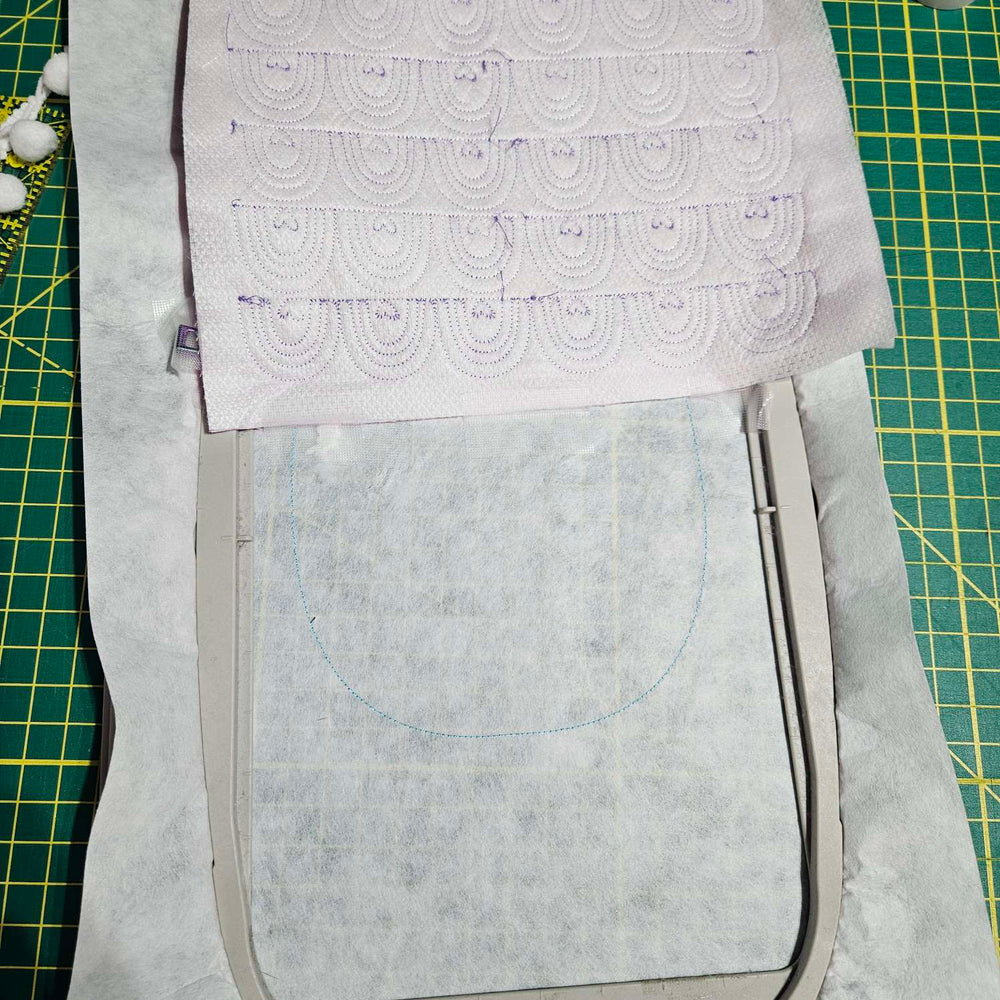
- To ensure you have enough fabric for the front and back exterior pieces of your scoop bag, leave the 9x14 quilted piece in one large piece. When you get to step 3 of the scoop bag, simply line up your fabric following the tutorial so that the top arch of the first row of rainbows will be lined up with the tack down stitch line (step 4 of the scoop bag)


- After running step 6, (the front exterior piece and liner should now be secured), carefully trim off the excess quilted fabric from the bottom leaving about a ½ inch seam allowance along the bottom of the scoop bag. (I cut mine a little too close in the pictures.)


-
Continue following the full scoop bag tutorial and before running step 9-you will center the piece of quilted exterior fabric you just cut right side down making sure it covers the entire bag. Insert pic 15
-
Finish running steps 9 and 10 using the full PDF tutorial as your guide.

You now have an adorable rainbow-heart quilted POP Scoop bag! Think of the possibilities! You can choose any of the POP quilting designs, or you can even use the quilting step from a mini quilt to pre-quilt fabric for any POP bag. We can’t wait to see what you come up with so don’t forget to share your finished projects with us over in the Parker on the Porch Facebook group!


